Hướng dẫn cấu hình VDOM trên Firewall Fortigate
Bước 1. Tìm hiểu tổng quan về công nghệ VDOM.
Virtual Domains (VDOM) được sử dụng để chia FortiGate thành hai hoặc nhiều đơn vị ảo hoạt động độc lập. Các VDOM có thể cung cấp các chính sách bảo mật riêng biệt và ở chế độ NAT, các cấu hình hoàn toàn riêng biệt cho các dịch vụ định tuyến và VPN cho mỗi mạng được kết nối.
Có thể hiểu Mỗi VDOM là 1 firewall ảo (Virtual Firewall) ở trong 1 thiết bị Firewall Vật lý. Fortigate đã rất tiến bộ để định nghĩa riêng ra VDOM giải quyết cho các bài toán của doanh nghiệp, giúp tiết kiệm chi phí khi có nhiều Firewall hơn trong 1 thiết bị.

Bước 2. Chuyển Firewall sang chế độ VDOM mode. Firewall Firewall Fortigate không kích hoạt VDOM mode được ở chế độ GUI thì ta có thể sử dụng CLI sau để kích hoạt VDOM mode
|
config system global set vdom-admin enable end |

Bước 3. Khởi tạo VDOM trên Firewall Fortigate.
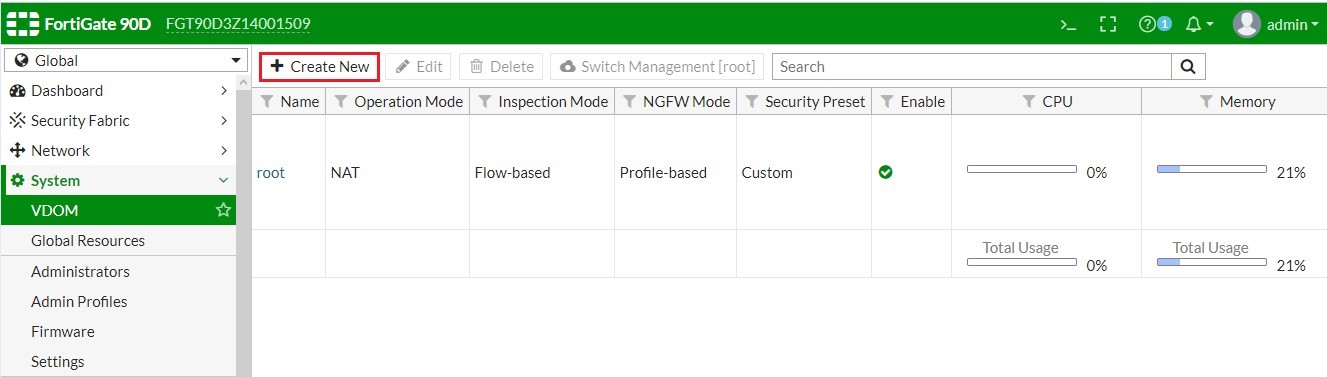

By default, root is the management VDOM. You use the management VDOM to access the global settings for the FortiGate as well as the settings for each VDOM.

Bước 4. Gán các Interface tương ứng vào VDOM. Loại trừ các cổng P1-4, P5-8 khỏi interface Internal.
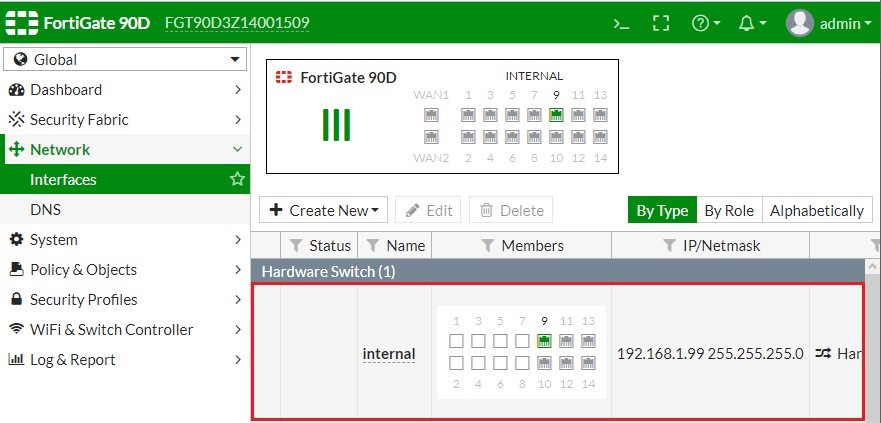

Quy hoạch Interface vào VDOM tương ứng.


|
FGT90D3Z14001509 # config global FGT90D3Z14001509 (global) # config system interface edit wan1 set vdom VDOM-A end config system interface edit wan2 set vdom VDOM-B end config system interface edit internal1 set vdom VDOM-A end config system interface edit internal2 set vdom VDOM-A end config system interface edit internal3 set vdom VDOM-A end config system interface edit internal4 set vdom VDOM-A end config system interface edit internal5 set vdom VDOM-B end config system interface edit internal6 set vdom VDOM-B end config system interface edit internal7 set vdom VDOM-B end config system interface edit internal8 set vdom VDOM-B end |
|
FGT90D3Z14001509 # config global FGT90D3Z14001509 (global) # show system interface config system interface edit "wan1" set vdom "VDOM-B" set mode dhcp set allowaccess ping fgfm set type physical set role wan set snmp-index 1 next edit "wan2" set vdom "VDOM-B" set mode dhcp set allowaccess ping fgfm set type physical set role wan set snmp-index 2 next edit "modem" set vdom "root" set mode pppoe set type physical set snmp-index 3 next edit "ssl.root" set vdom "root" set type tunnel set alias "SSL VPN interface" set snmp-index 4 next edit "internal" set vdom "root" set ip 192.168.1.99 255.255.255.0 set allowaccess ping https ssh http fgfm capwap set type hard-switch set inbandwidth 5000 set outbandwidth 5000 set stp enable set device-identification enable set device-identification-active-scan enable set role lan set snmp-index 5 next edit "ssl.VDOM-A" set vdom "VDOM-A" set type tunnel set alias "SSL VPN interface" set snmp-index 8 next edit "ssl.VDOM-B" set vdom "VDOM-B" set type tunnel set alias "SSL VPN interface" set snmp-index 9 next edit "internal4" set vdom "VDOM-A" set type physical set snmp-index 10 next edit "internal3" set vdom "VDOM-A" set type physical set snmp-index 11 next edit "internal6" set vdom "VDOM-B" set type physical set snmp-index 6 next edit "internal5" set vdom "VDOM-B" set type physical set snmp-index 12 next edit "internal1" set vdom "VDOM-A" set type physical set snmp-index 7 next edit "internal2" set vdom "VDOM-A" set type physical set snmp-index 13 next edit "internal7" set vdom "VDOM-B" set type physical set snmp-index 14 next edit "internal8" set vdom "VDOM-B" set type physical set snmp-index 15 next end FGT90D3Z14001509 (global) # |

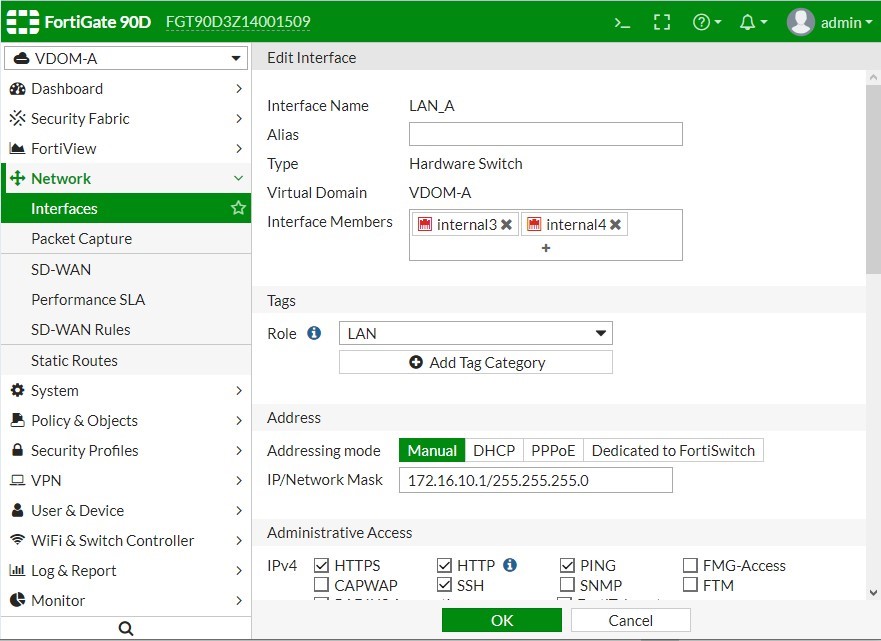
Bước 5. Cấu hình IP cho Interface tương ứng với VDOM.

|
FGT90D3Z14001509 # config global config system interface edit LAN_A set vdom VDOM-A set ip 172.16.10.1 255.255.255.0 set allowaccess ping https ssh http set type hard-switch set device-identification enable set role lan set snmp-index 10 nexts |
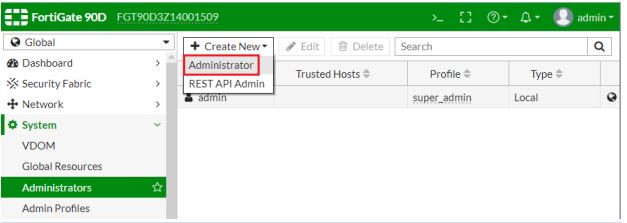
Bước 6. Thiết lập tài khoản quản trị tương ứng với mỗi VDOM.
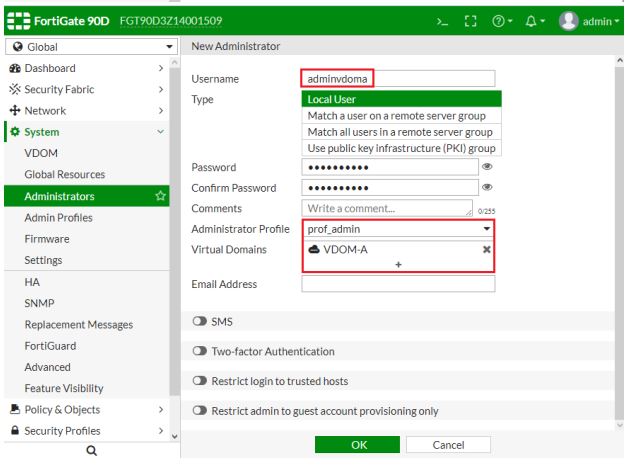
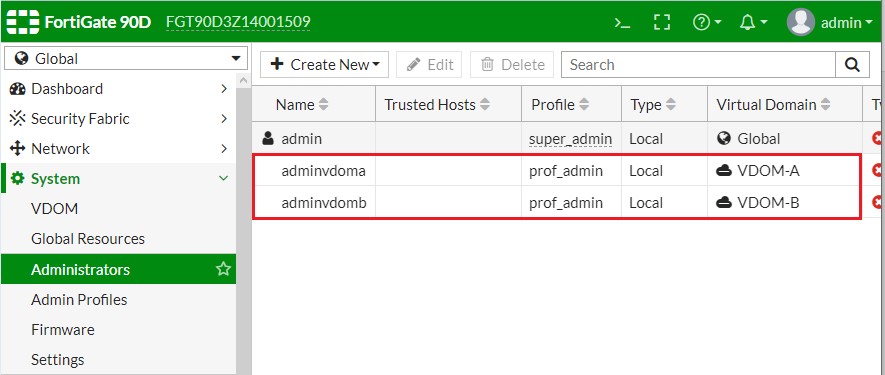
|
FGT90D3Z14001509 #
config global config system admin edit adminvdoma set vdom VDOM-A set password adminvdoma set accprofile prof_admin end |